Here at Roland DGA, one of the most defining trends we see for the industry today is the widespread adoption of integrated print/cut technology. Today’s integrated printer/cutters provide unattended printing and contour cutting on a single device. With their integrated design, printer/cutters streamline the production process, improve accuracy, and nearly eliminate the need to reload and reposition graphics, saving untold man hours and reducing costly mistakes.
It’s no wonder that an increasing number of professionals like you are switching to this powerful technology. In this technical brief, we will provide you with four reliable workflows you can use to create professional print/cut graphics. Developed by our own product managers, these detailed instructions serve as a production roadmap for even the most complex applications. Follow these simple steps for print/cut success every time.
Print/Cut Workflow
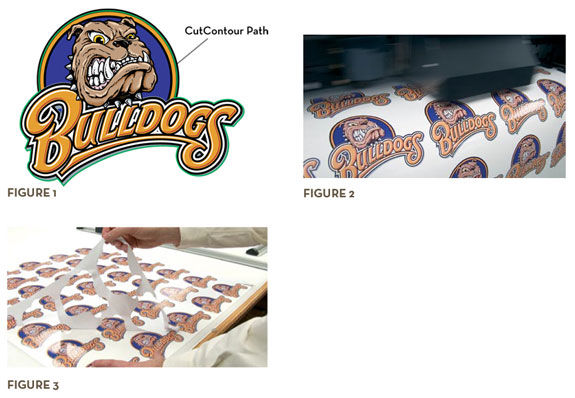
The integrated Print/Cut Workflow is the standard foundation for applications that do not require the added protection of lamination or clearcoating.
To begin, simply open a digital file and set cut paths in the software. Then send the graphic to the printer/cutter, where it is automatically printed and contour cut. Graphics come out ready to sell, or weed and apply.

- Set up your artwork with print data and cut paths. (Fig. 1)
To assure full bleed on your image, you may add a 1 pt. bleed to the outside edges of your design. - Send the artwork to the print/cut device for printing and cutting in a single step. (Fig. 2)
- Weed excess vinyl from the graphic and apply. (Fig. 3)
Print/Laminate/Cut Workflow
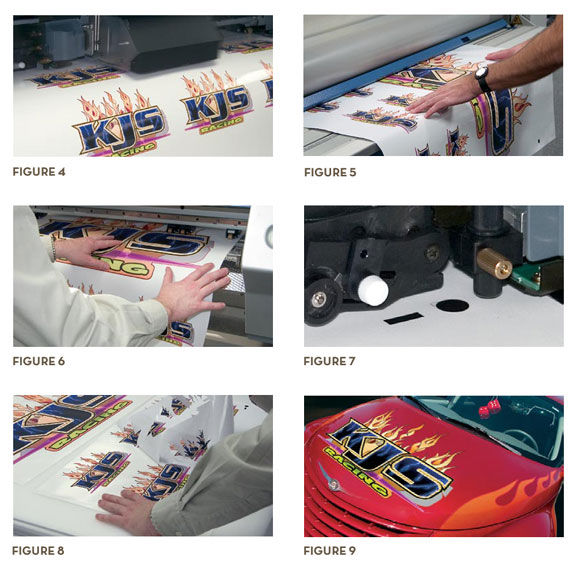
For jobs requiring extra durability, use overlaminate films. In this Print/Laminate/Cut workflow, printed graphics will be removed from the printer/cutter, laminated and reloaded for cutting.
This two-step process is best performed with an integrated printer/cutter. A single device will more easily achieve proper registration and turn out cut lines with more precision.

- Set up your artwork with print data and cut paths.
Once again, to assure full bleed on your image, you may add a 1 pt. bleed to the outside edges of your design. - Send the artwork to the printer/cutter for PRINT ONLY with Quadralign™ optical registration marks added. (Fig. 4)
- Remove the printed graphic from the printer/cutter.
Apply a laminate film to the printed graphic. (Fig. 5) - Reload the laminated print into the printer/cutter. (Fig. 6)Automatically align registration marks with Quadralign. (Fig. 7)
- Send CUT information only to contour-cut the graphics. The optical registration system automatically realigns the cutting path and compensates for any skew and distortion which may occur during lamination.
- Weed excess vinyl from the graphic. (Fig. 8)
- Apply transfer tape and install. (Fig. 9)
Print/Cut/Clearcoat Workflow
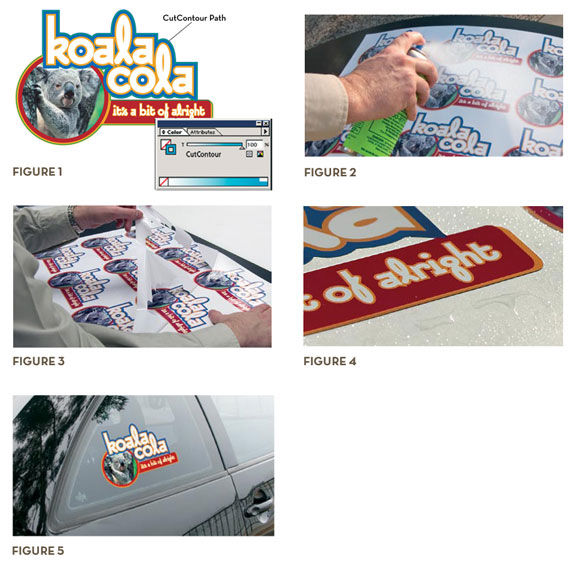
Adding liquid clearcoating provides short-term sun, moisture and abrasion protection. Liquid clearcoats are often used on vehicle graphics to take the abuse of car washing, scuffing, and daily wear and tear.

- Setup your artwork with print data and cut paths. (Fig. 1)
- Send the artwork to the print/cut device for printing and cutting in a single, unattended step.
- Remove the graphic and spray it with a UV clearcoat. It is best to apply two light coats rather than a single heavy coat. This avoids runs and tackiness. (Fig. 2)
- Weed unwanted vinyl from the graphic while it’s still wet. (Fig. 3) Allowing clearcoat to dry can make the cut edges meld together if the spray has been applied too heavily. If the graphic is weeded prior to coating, the clearcoat can create an undesirable raindrop effect on the liner, which can be messy when trying to apply transfer tape. (Fig. 4)
- If time permits, allow the coated graphic to dry overnight. Apply transfer tape and install. (Fig. 5)
Print/Cut/Laminate/Cut Workflow
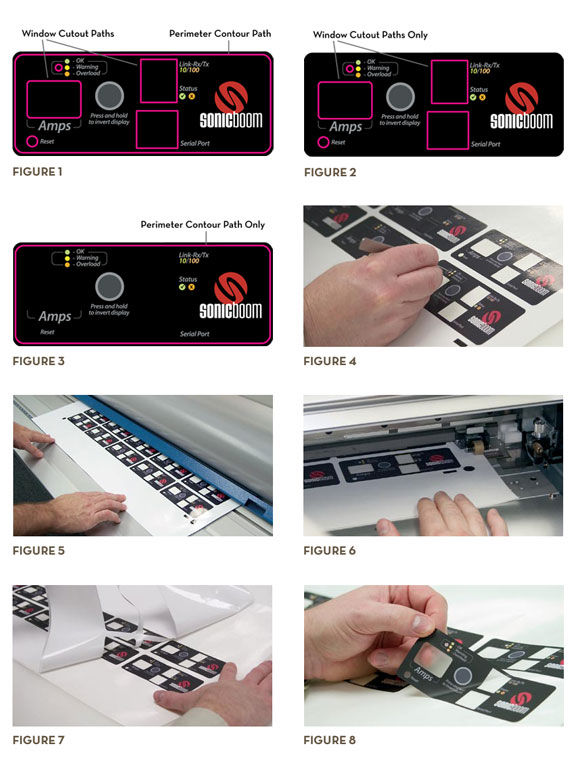
Some applications require different cut lines for the printed vinyl graphic and the laminate which protects it. This allows you to have laminated “windows” cut out of the graphic, or to have laminate material extend beyond the perimeter of the graphic, allowing it to be applied without the use of edge tape. To create these applications, you will print once and cut twice, using the following Print/Cut/Laminate/Cut workflow.

- Set up the vector artwork on screen with two sets of cut paths. (Fig. 1) The first set of paths represent the WINDOW CUTOUT vectors. These are the paths that will be cut through the printed vinyl, but not the overlaminate – creating a ‘window’. The second cut path defines the ultimate finish CONTOUR CUT through the laminate and vinyl.
- Using the clipboard, cut away the paths that represent the finish cut through the laminate vinyl.
- Save the file (with the window-cutout paths in place) as your first .eps file. (Fig. 2)
- Paste back the CONTOUR-CUT vectors. Remove the WINDOW CUTOUT vectors. Re-save as a second .eps file. This file contains the shapes that get cut all the way through both the vinyl and laminate. (Fig. 3)
- Print and cut the first file with Quadralign optical registration marks.
- Weed away the vinyl where the windows will be. (Fig. 4)
- Laminate the graphic with pressure sensitive vinyl or polycarbonate film. (Fig. 5)
- Reload onto the print/cut device and align cropmarks with Quadralign. (Fig. 6)
- Send CUT information for the second .eps file. This will cut all of the desired contours and cutouts through both the vinyl and laminate.
- Weed the graphic (Fig. 7) to reveal finished decal with laminated windows. (Fig. 8)
This article has been excerpted from Roland DG’s popular instructional booklet, Taking the Mystery Out of Print/Cut. The ultimate guide to print/cut technology, this valuable, information-packed resource has already helped thousands of Roland DG customers streamline their production environments and grow their businesses. Watch Taking the Mystery Out of Print/Cut Video.

