As any chef will tell you, the best recipes start with the right ingredients. And in the world of print/cut, the best graphics begin with a great piece of art.
The right artwork can be anything from a simple logo to a complex combination of photography and type. It can be 1/2” tall or 30 feet wide. It should have personality, color, detail, and most important, a definitive shape that takes advantage of the impact of print/cut production.
Turning your art into a print/cut graphic is simple in theory: you add a spot-color Cutting Path that tells the RIP or device driver exactly where you want your final cut lines. To ensure success, however, is a bit more complicated. There are specific guidelines you need to follow in order to make sure that the driver recognizes your cut path and accurately processes it. Read on for details on how to make sure your great piece of art delivers a great print/cut graphic.
What Programs to Use
For best results, most print/cut pros recommend vector-based graphics programs such as Adobe® Illustrator® and CorelDraw®. The biggest advantage of vector artwork is that it is resolution independent, so graphics can be reprinted at virtually any size. You may think you’re only doing a t-shirt design, but the client may love it so much they want to put it on their truck next month.
The Basic Setup of a Print/Cut File

Figure 1

Figure 2

Figure 3

Figure 4
- Create your original artwork. It may be a vector image, or a combination of vector and bit-mapped elements. (Fig. 1) If there are bit-mapped images included in the file, be sure to build the file at the proper size and resolution for your final desired output (Guidelines discussed later in this article).
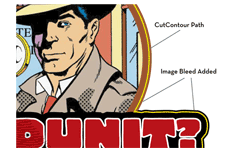
- Define the final cutting path. Create a path that defines the exact shape where you want all cuts to occur, including the perimeter contour cut and any cutouts within the graphic. (Fig. 2)
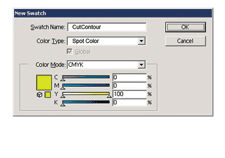
- Apply a Spot Color to the path. This is the most important step. In order for the RIP software to recognize this as a cutting path and not a shape to be printed, you need to create a Spot Color swatch called “CutContour” (Fig. 3) and apply it to your cutting path (Instructions for this process follow). Once you’ve applied the “CutContour” spot color to your image, the cut path line will appear as a colored line on your screen. Don’t worry. When you send the file to a Roland DG printer/cutter, the RIP will replace this color with “marching ants” along the cut path, and it will not appear on the print.
- Add a bleed to your image. To avoid white hairlines and ensure a clean edge to your final print/cut graphic, you may add a bleed to the outside edges of your artwork. (Fig. 4) Anything from a 1 pt – 3 pt line works very well.
- Save your artwork. When finished, save as a .ps, .eps, or .prn file.
Creating a CutContour Swatch in CorelDraw®

- Click on Tools and select Palette Editor.
- From the drop down menu select Custom Spot Color.
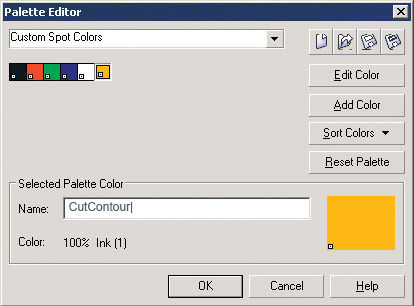
- To create a new Spot Color, click on Add Color.
- In the Select Color window, click on Mixers.
- Select any color you want from the color wheel. Click on Add to Palette.
- Change the name of the Selected Palette Color to CutContour, click on OK.
For the RIP to recognize the Cutting Path, the name must be CutContour, spelled exactly as it appears. - To apply the CutContour spot color to your artwork, click on the Outline Pen.
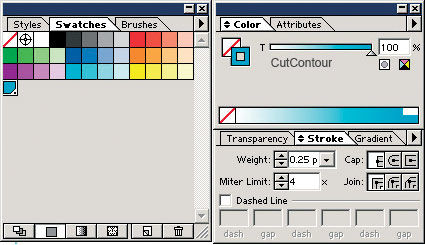
- Select the CutContour spot color. Width should be set to Hairline.
Creating a CutContour Swatch in Illustrator®

- Click on Window, select Show Swatches. Click right arrow, select New Swatch.
- The Swatch name must be CutContour. The Color type must be Spot Color.
- The color values for the swatch may be set to any you choose. From the Stroke tab, use the following settings: Weight .25; Miter limit 1; Transparency: Normal Opacity at 100%.
Color Mode
It’s always best to work on digital print projects in the RGB color mode, rather than CMYK. Your digital printer is capable of printing a much larger gamut of colors than that available in the CMYK mode, so creating your file in RGB and leaving it in that color space allows you to take full advantage of the color gamut of the printer. Working in RGB also reduces overall file size by up to 25% over CMYK. Do not create images in LAB or Indexed Color. Convert any images in these modes to RGB before beginning production.
Working with a Photoshop File

In addition to working with photos, many artists use Adobe® Photoshop® to add photorealistic “airbrushing” and 3D effects to images originally created as vector art. But be careful. Once the file is brought into Photoshop, you are limiting your image resolution. Be sure to make the file as large as you think you may ever need it. This can mean a great looking image, but the price tag can be a huge graphic file. Once you have worked on the image in Photoshop, you’ll need to bring it back into a vector program to add your Cutting Path.
You may receive a customer’s logo as a flat jpeg or tiff file and need to create your own cutting path. While you can always open the file in your vector-based program and create the path by hand, you may want to try the following shortcut:
- Open the file in Photoshop.
- Use the Magic Wand or Magnetic Lasso Tool to select all of the negative space around the logo.
- Choose Select, Inverse. Now your selection represents the outer perimeter of the logo itself.
- In the Paths palette, choose Make Work Path. This creates a path that follows the contours of your logo. Save this path.
- Use the selection tool to copy the path to the clipboard.
- With the tool still on the clipboard, open the logo file in your vector-based program. Paste in the path.
- Use pen tools to fine-tune the path. Color the stroke with the Spot Color called CutContour. Save file as an .eps.
Image Resolution
If you’re working with a vector image, resolution is not an issue. It can be re-purposed to any size and print setting with no impact on image quality. For bit-mapped images, however, the resolution of the original file determines the limits on the final print size and quality. You need to consider the final use of the graphic, and whether it may be re-purposed later, when creating a bit-mapped file. As a general rule, your image resolution in pixels-per-inch (ppi) should be about 1/4 your desired dots-per-inch print resolution (dpi). For example, if you plan to print at 720 dpi, your image file should be built at 180 ppi at actual size. Another way to determine the appropriate resolution is to consider viewing distance, as the following chart illustrates.
Viewing Distance and Image Resolution
| Distance | Resolution | |
| Less than 1 ft | 180 ppi | |
| 1 to 4 ft | 150 ppi | |
| 5 to 9 ft | 100 ppi | |
| Over 10 ft | 50 ppi |
What Happens in the RIP
Once your print/cut graphic is built, your Roland DG VersaWorks® RIP software will provide you with a multitude of options for working with that graphic. Most importantly, your RIP will recognize the CutContour spot color and convert anything it is applied to from a printing path to a cutting path.
You may use the RIP software to resize, mirror, or tile the graphic, to print/cut any number of multiples of the graphic, or to nest several jobs together. If you’re printing multiple images using the Auto-Nesting or Manual Print Layout features, the cutting path will be correctly duplicated and registered for every copy.
You will use your RIP software to define the resolution and print quality of your finished print. Your RIP software contains a complete spectrum of predefined color profiles designed to produce the best possible results by adjusting the number and placement of ink droplets to precisely coordinate with the media and resolution being used on the job.
This article has been excerpted from Roland DGA’s popular instructional booklet, Taking the Mystery Out of Print/Cut. The ultimate guide to print/cut technology, this valuable, information-packed resource has already helped thousands of Roland DG customers streamline their production environments and grow their businesses.Watch Taking the Mystery Out of Print/Cut Video.

